I’m currently out traveling and for a variety of reasons, a self-contained mobile travel router setup is desirable for me. This was pretty simple to set up with an off-the-shelf GL.iNet, TracFone, and power bank–with a few gotchas to look out for: while piecing together this setup, I discovered that GL.iNet travel routers were actually incompatible with my TracFone (and I assume a number of other common phones); SSH’ing into the underlying router OS and making some quick configuration changes is all that’s necessary to unblock a blocked phone.
Did you stumble on this article after searching up unregister 'rndis_host'? Skip to the fix.
Motivation
Skip this Section
Before proceeding, it’s worth asking if a mobile travel router connected to the Internet via a tethered mobile phone is even necessary for your use-case.
Mobile travel routers are pretty useful for a variety of reasons, including security, privacy, and monetary savings.
A number of guest networks with a captive portal are open and unencrypted, an inherent limitation as they’d otherwise run into a bootstrapping problem: in order to be served a captive portal to register for the guest network, you need to be connected to the network itself, but you can only connect to the network without a pre-shared key if the network is open. This is a common misconception that I’ve seen even network and security engineers get mixed up: a captive portal is for CYA, not security; while you can enable AP isolation and configure routers to only route out, the radio waves over the air are carrying data that is inherently unencrypted, and a malicious actor could just sniff the airwaves with a Wi-Fi NIC in monitor mode.
As an aside, most guest networks with captive portals know who’s registered by tracking the device MAC address after a successful registration. Because the network is open, a malicious attacker could sniff and filter for common application traffic such as HTTP(S) and infer that the MAC address involved in such traffic is registered. MAC addresses are trivially spoofable, so the network wouldn’t be able to tell the difference if a malicious attacker spoofed their MAC address in order to use guest Wi-Fi on someone else’s tab.
$ macchanger -m XX:XX:XX:XX:XX:XX ${interface}
This is illegal, of course, so don’t do that.
It’s important that your application traffic is encrypted on open networks in order to minimize data leakage through passive sniffing. By connecting to a travel router network secured with a pre-shared key and VPN tunnel, your traffic over-the-air between your endpoint and the travel router is encrypted by the PSK, and your traffic between the travel router and VPN server is encrypted by the VPN, enhancing your security and privacy. While you could just tunnel beginning from your endpoint, placing the VPN on the travel router similarly allows you to consume only one license instead of multiple and avoids needing to install a VPN client on each guest device.
A VPN also masks your traffic behind a predictable exit IP, if that matters. Maybe you need to make it look like traffic is originating from your home network as some of your firewall policies only allow traffic from that IP. Maybe you need to appear to originate from a certain country in order to access some content. There are a variety of reasons why this may be desirable for certain audiences. This adds an additional element of privacy.
Fun fact: VPNs encrypting traffic isn’t their original purpose. It’s actually a side effect.
“This is an often-misunderstood fact about VPNs. The reason for encryption is not to increase the security of using the physical LAN, but rather to mitigate the added risk that VPNs introduce when they create a virtualized LAN over the Internet.”
Finally, and frankly the most common motivation for most people to get a travel router, you can connect multiple devices to your travel router and they’ll all have Internet access, and only your travel router needs to be registered. This may help bypass some fees commonly charged by businesses such as hotels for access. From the network’s perspective, you only registered 1 device.
Captive portal guest networks have a plethora of vulnerabilities and misconceptions about them, but that's a topic for another time.
If you’ve taken all of this into consideration and calculated that this is indeed a solution to a problem that exists for you, read on.
Materials
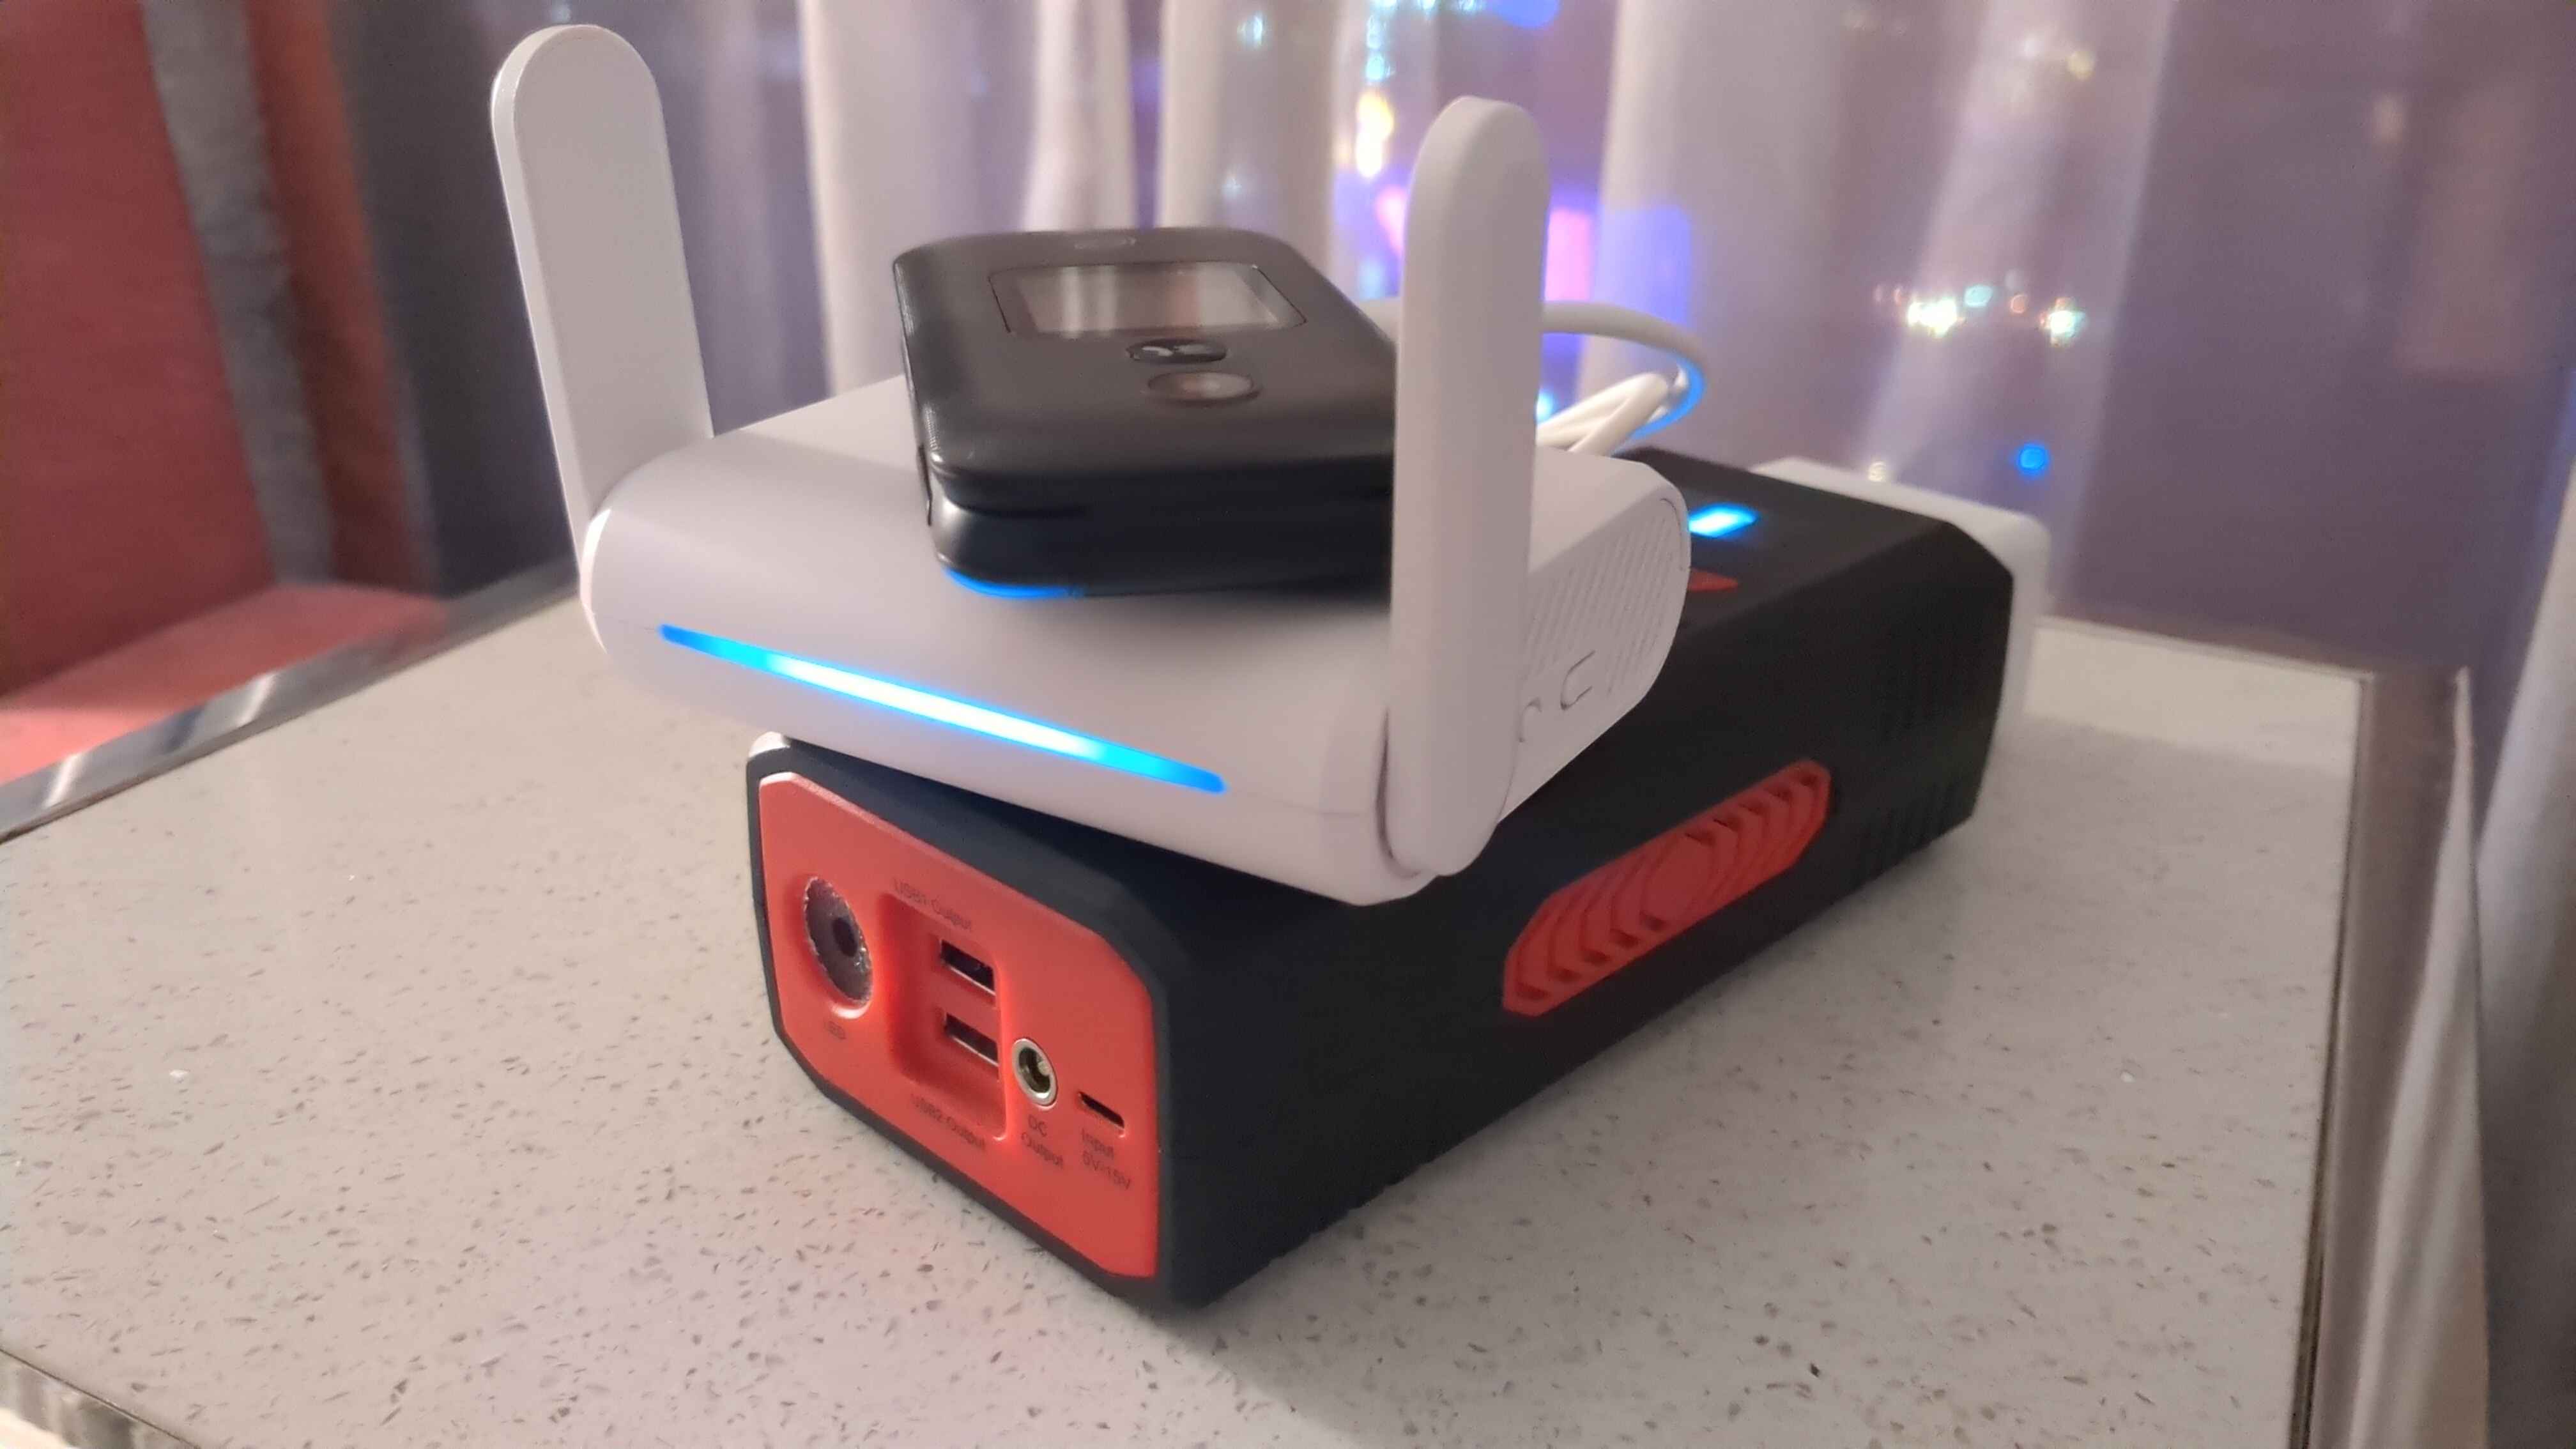
The first component to this setup is a mobile travel router. I’m personally using a GL.iNet GL-SFT1200 that I got for less than $40 USD. I had no specific motivation for getting this particular model besides that it was cheap. Make sure it has a USB port for tethering.
The second component to this setup is a mobile phone with a cellular data plan that can tether the mobile travel router in order to provide a cellular-based uplink when a traditional uplink is unavailable. For my own reasons, I’m using a burner TracFone My Flip 2 that I got for $20 USD coupled with a cellular data plan.
Although I’m using a burner phone, the vast majority of people don’t need to–it all depends on your threat profile and risk appetite; your regular mobile phone should be sufficient as long as the cellular plan includes data and has no restrictions on tethering.
Finally, the third, optional component to this setup is a power bank. This just allows the travel router to be used without the need for an outlet. Many travel routers can be powered entirely by USB-C off of a modern laptop, which is functionally acting as a power bank.
I haven’t taken any specific power consumption measurements but I can say that my 27000 mAh external power bank powered my GL.iNet + TracFone setup for a total of approximately 24 working hours and barely broke 50% consumption. Some rough calculations, assuming my power bank’s 27000 mAh rating is correct, indicates that this setup draws approximately 500-600 mA. This is just a rough measurement but may assist you for broad-strokes purposes in calculating a power bank suitable for your needs.
Connection and Configuration
Connect the travel router to the power source, and then connect the mobile phone to the travel router.
On the mobile phone, enable USB tethering. For most Android phones, you can enable USB tethering in Settings > Network & internet > Hotspot & tethering > USB tethering. For KaiOS, you can find this in Settings > Network & Connectivity > Internet Sharing > USB tethering.
You’ll need to connect to your travel router for initial setup, usually through a web-based UI. For the GL.iNet GL-SFT1200, it spawns a default Wi-Fi network upon first boot; you can find the SSID and network key printed on a sticker on the bottom of the travel router. You can also usually find the router’s IP address printed on a sticker on the travel router, which you can navigate to after connecting to the network.
If you are in a physically insecure or otherwise untrusted area, I do not recommend you do initial setup over Wi-Fi, as the default GL.iNet network key is goodlife and the web UI is not encrypted over-the-air. Your setup will be susceptible to interception.
I strongly recommend that you use a physical connection.
If you plan on having your client devices connect to the travel router over Wi-Fi, which is typical for most use-cases, you’ll want to configure a network over in the Wireless configuration page. Make sure that you disable networks that you don’t use and configure strong network keys for networks that you will use.
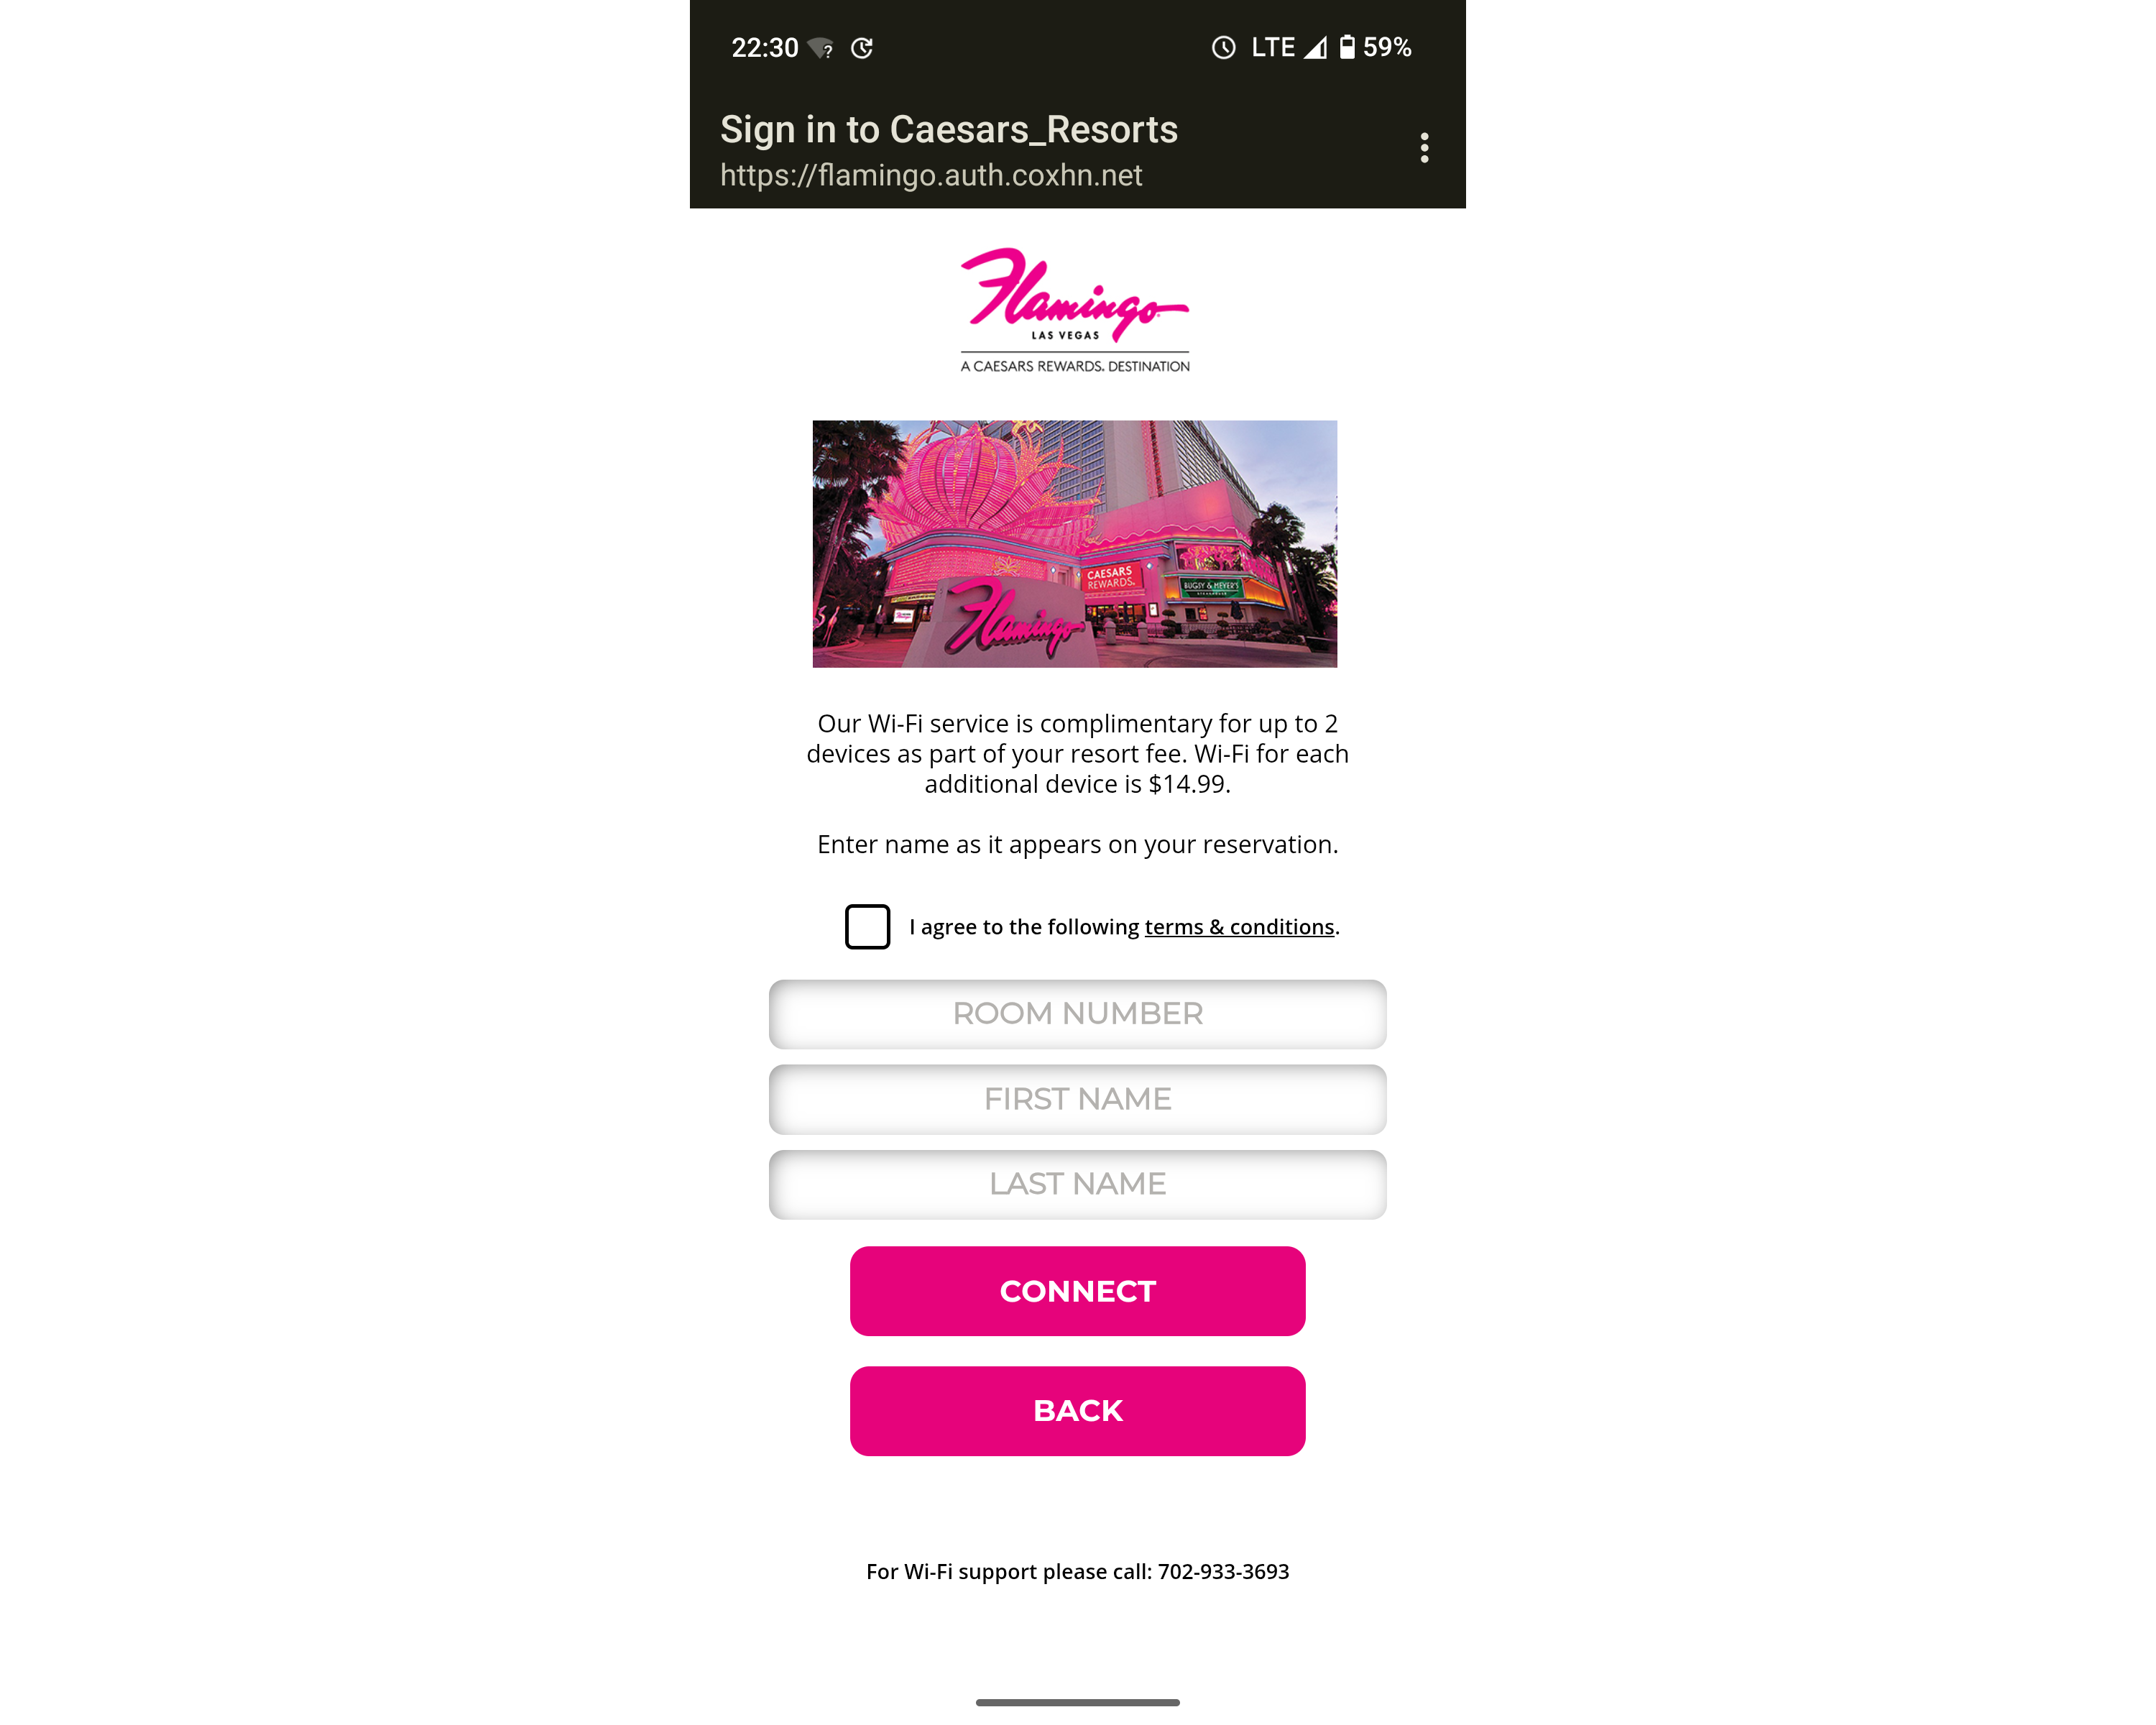
If you’re staying somewhere static, such as a hotel, you can configure the travel router to act as a repeater on the Internet configuration page. If there is a captive portal, you can use a client device such as a laptop or phone connected to the travel router’s Wi-Fi network and try to connect to any website, as it should be redirected to the captive portal where you can register on behalf of the travel router. No MAC spoofing is necessary on your side as the router is essentially creating a man-in-the-middle to proxy the captive portal web requests with its own MAC address on its wireless interface. This will save you from having to pay for Internet access per-device, as is typical for most hotel guest networks.
When you’re mobile, the travel router will fall back to the tethered mobile phone’s cellular connection. If you see your mobile phone in Internet > Tethering, then congratulations – your device is supported out-of-the-box! If you don’t, then your device may be blocked.
Unblocking Blocked Devices
Skip this Section
It’s pretty easy to unblock blocked devices by just changing a config file in the underlying OS. These GL.iNet routers appear to usually just be running OpenWrt under the hood, and the vendor graciously allows you to access the underlying OS via a root shell as long as you’re fine with having no vendor support.
The tell-tale sign that your mobile phone device is blocked from tethering is if you go to System > Log > Kernel Log in the GL.iNet web UI and see something similar to the following after enabling tethering on the plugged-in mobile phone:
[ 2800.131431] usb 1-1: new high-speed USB device number 9 using dwc2
[ 2800.397546] rndis_host 1-1:1.0 usb0: register 'rndis_host' at usb-17000000.usb-1, RNDIS device, xx:xx:xx:xx:xx:xx
[ 2802.093173] rndis_host 1-1:1.0 usb0: unregister 'rndis_host' usb-17000000.usb-1, RNDIS device
The USB device is being immediately unregistered upon connection. I’m still uncertain why this is since tethering is an advertised feature of both the GL.iNet travel routers as well as most burner phones. Fortunately, the fix is very simple.
Go to System > Advanced Settings and navigate to the LuCI interface. Set up your root administrator account. In the LuCI interface, go to System > Administration and make sure that SSH access is enabled.
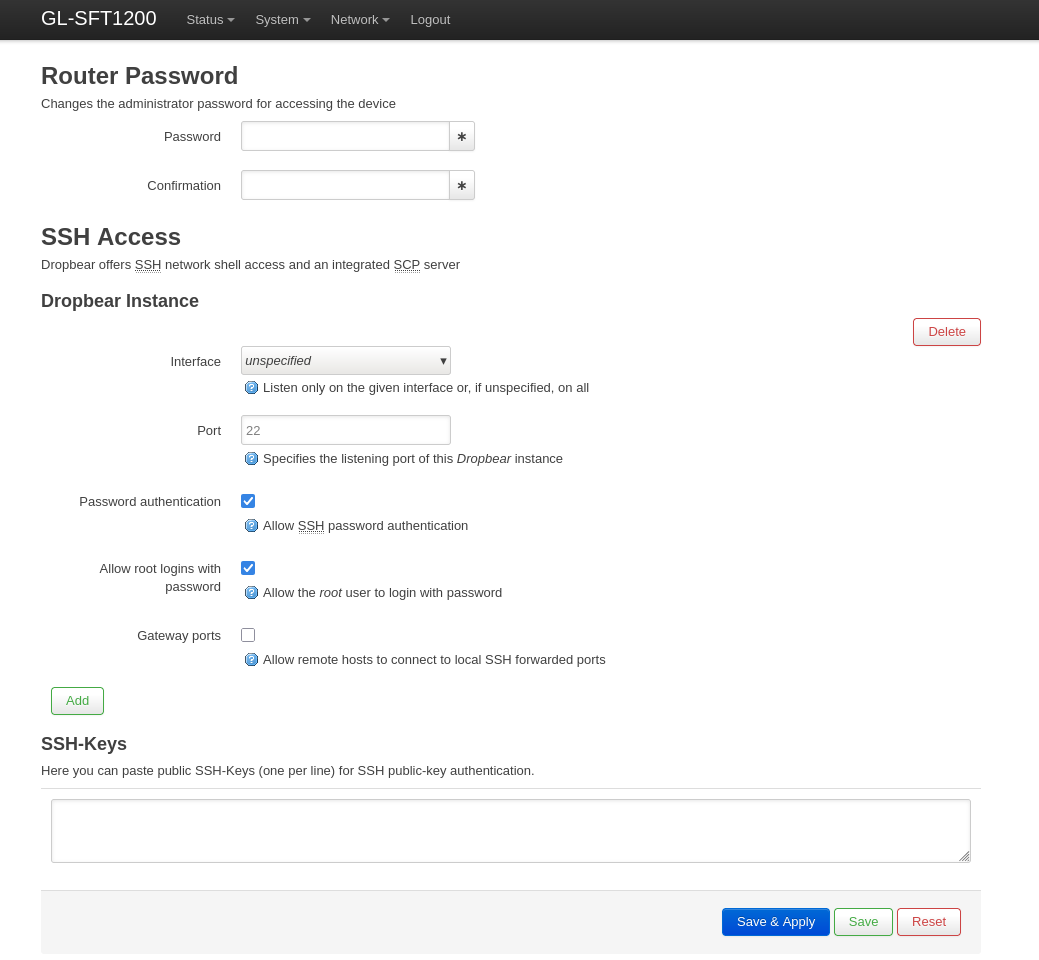
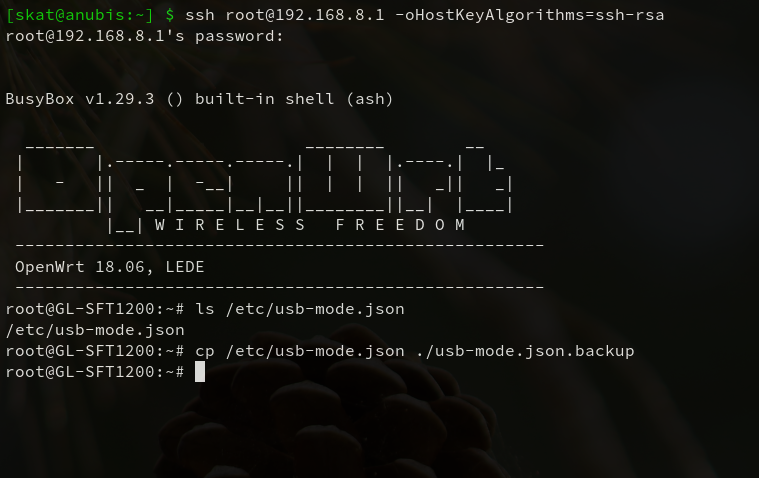
You should be able to SSH into the router to get a root shell now. The configuration file in question is /etc/usb-mode.json; verify that this file exists, and make a backup of it.
$ ssh root@192.168.8.1 -oHostKeyAlgorithms=ssh-rsa
# ls /etc/usb-mode.json
# cp /etc/usb-mode.json ./usb-mode.json.backup
We’ll need to remove a section of this configuration file that automatically ejects the mobile phone based on its USB vendor ID and product ID. In order to find the section to remove, we need to first discover the device’s USB vendor and product ID using lsusb.
Remove the device and run lsusb. Then, plug the device back in, enable USB tethering on the device, and run lsusb again. The new entry in the output is the mobile phone’s USB vendor and product ID.
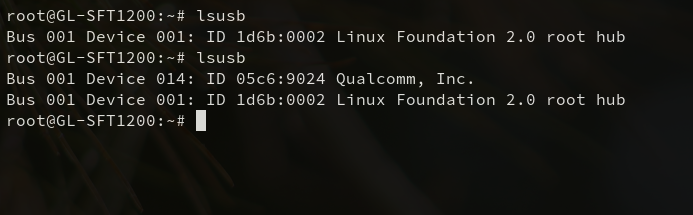
In this case, my TracFone My Flip 2’s USB vendor ID is 05c6 and its product ID is 9024.
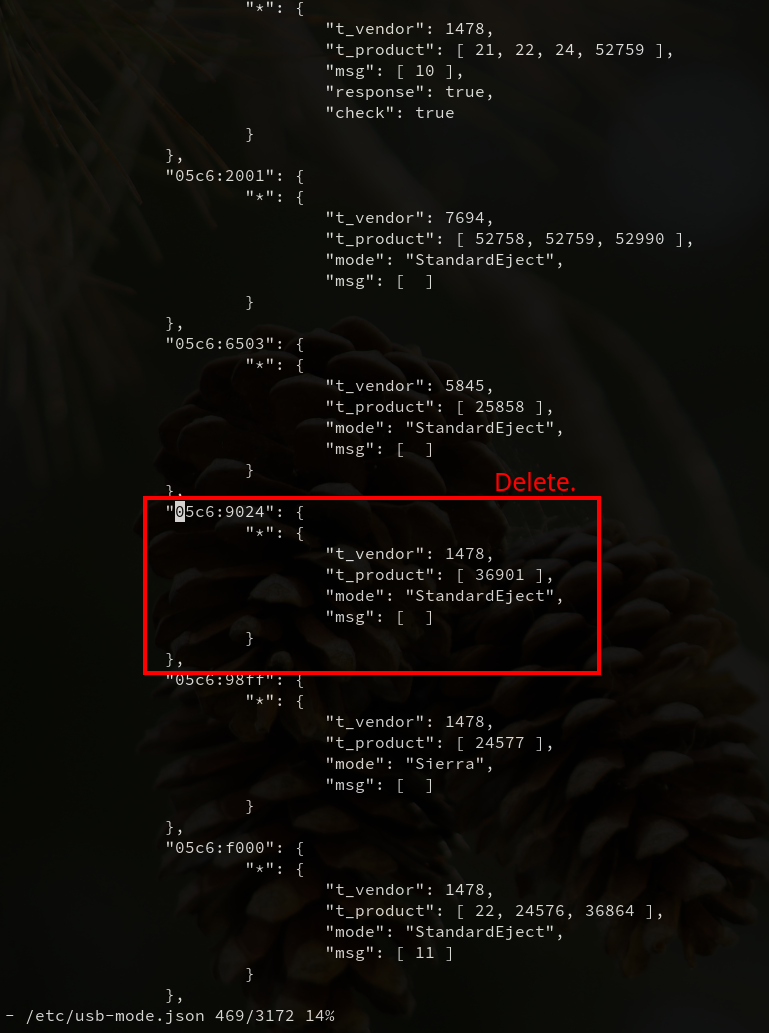
You’ll want to find this entry in /etc/usb-mode.json and delete it.
You can use a / query to quickly find the entry formatted as vendor:product and then use dd to delete the lines. You can then save and exit vi with :wq.
/05c6:9024
dd   (all lines)
:wq
A reboot is usually not necessary. You should be able to try tethering again and observe a success on the Internet configuration page now.
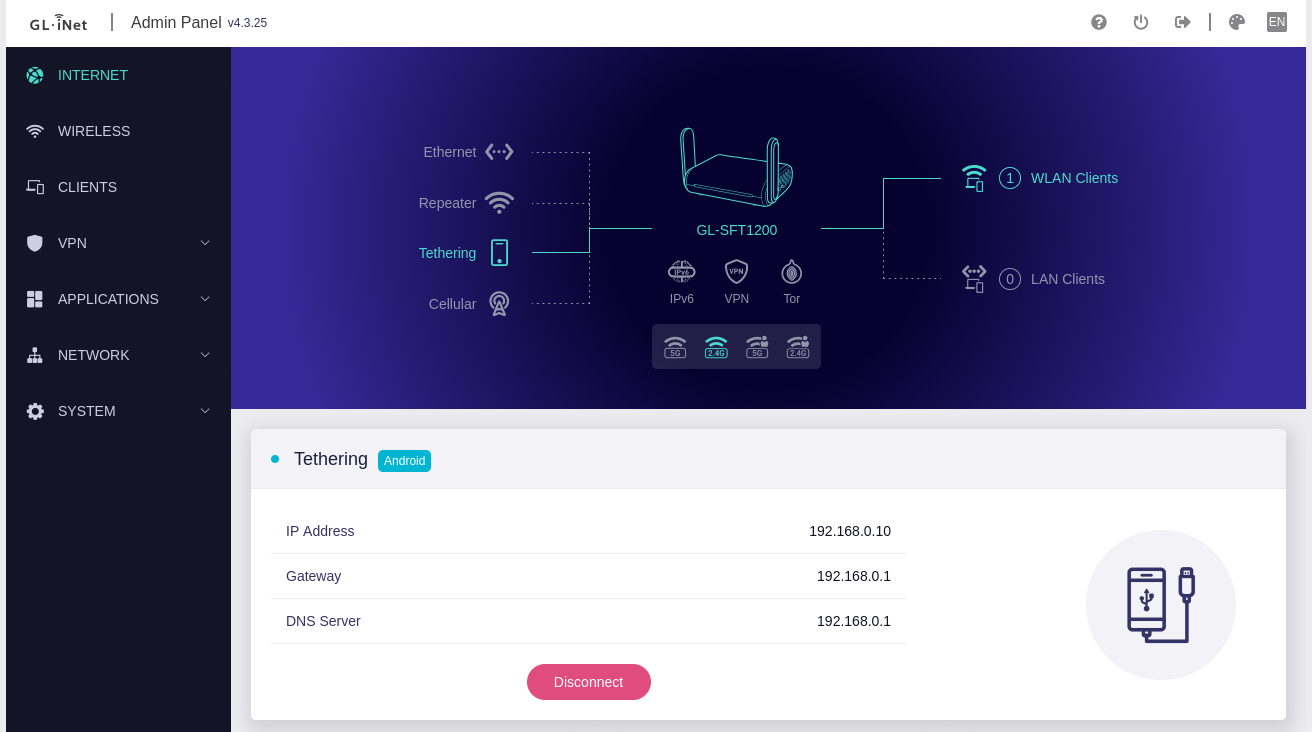
Your mobile phone has been unblocked successfully and is now able to supply the travel router with a cell-based uplink.
Final Safety Configurations
Obviously, remember to practice strong password policy. Make sure that the admin UI password and root administrator passwords are both strong and non-default. Make sure that the network key is strong.
Make sure that your firmware is up-to-date. Having a strong password policy and keeping your systems patched is common-sense cyber hygiene that everyone should abide by.
Make sure to audit your Wi-Fi networks to make sure that unused networks are disabled. Additionally, make sure that your enabled Wi-Fi network is not open.
Depending on your threat model, you may want to spoof a MAC address for your travel router in Network > MAC Address. If you do this, make sure it’s prior to registering the travel router to any captive portal networks such as a hotel network, and make sure the MAC address stays the same for such a registration in order to avoid incurring additional costs.
Finally, I’d highly recommend routing your traffic through a VPN. You can set this up in the VPN configuration page. This will ensure that your traffic is encrypted from the travel router to the VPN server, providing a layer of protection against over-the-air interception. Remember that a VPN isn’t a magic bullet to security: a privacy VPN mitigates risk over untrusted networks by placing trust in an external VPN server. Everything depends on your threat model and risk appetite.
Happy hacking!